Showing posts with label tutorials. Show all posts

Sunday, 7 October 2012

Let Your Hair Down Sunday...

Wedding dinners are going to be abundant in this month and the coming months.
In stead of just letting your hair down or spending a BOMB at the saloon,
why dont save some bucks and try this Super Simple Chic Chignon...

photo/post/graphic design: Kristin Ess

This is one of those updos that really allows you to focus on the dress, accessories and overall beauty instead of being a major focal point. Let’s get started!
  1. Start with all of your hair in a ponytail. I like to place the pony at the occipital bone (that bone you can feel in the back of your head).
  2. Next, slide the ponytail holder down about an inch or 2 and split it down the center as you see in photo #2.
  3. Flip the ponytail up and feed it through the split, grabbing it with your fingers from underneath and pulling it through.
  4. Now give the ponytail a gentle tug so it tightens back up.
  5. Your ponytail should look like this. There should be a slight separation where you’ll be tucking hair later in step 7.
  6. Use a comb to tease the ponytail. You can tease as little or as much as you want. The more you tease, the bigger your bun will be. The less you tease, the tighter the bun will be. Once your done teasing the hair, smooth the outside of it gently by using a smoothing brush.
  7. Wrap the ponytail around one hand and tuck the tail of the ponytail into the hole you created when you twisted the hair.
  8. Once you’ve tucked the excess, start pinning the bun in place. Gently pull it apart to make it fuller. The teased hair acts like stuffing, so you can spread it out carefully for a little more volume! If you hairspray as you go, you won’t have to worry about it falling out so much. Use the larger bobbypins to start securing the bun and then use the smaller ones around the edges. For updos like this it’s crucial to have a strong holding hairspray, but one that doesn’t get sticky or look wet. My all time favorite hairspray for doing updos is THIS ONE ! It’s called SuperHold and it’s like liquid bobby pins! It’s got amazing hold and it stays dry. Once you have it all in place, give it a good spray all over and lay down any unwanted fly-aways.
A fuller bun + a tighter bun can both look great for different reasons. For example– I would do a bigger bun for a wedding and maybe a tighter bun if I’m going to a work meeting. Also consider head size– for a smaller head, don’t overwhelm the silhouette by making a huge bun because it could make your head look even smaller. Use a hand mirror to check on your proportions from different angles as you go.
And a simple ribbon or accessories to add the last touch.
Have a happy Sunday!


Saturday, 6 October 2012

Nail It!


Prep your nails this Saturday with beautiful OMBER...

photos + post by Kristin Ess

We’ve seen lots of ombre techniques in the past, but this one is pretty cool because it’s done on your bare nails and has more of a stain effect than looking like actual nail polish. This was much easier than I thought it was going to be, but you should be prepared to practice once or twice before doing the actual mani. It’s all about technique! Here we go:
You will need: 3-4 gradient nail polish colors (dark to light and all in the tonal family), a clear top coat, a triangle makeup sponge, a cup of water, a piece of paper for blotting the polish, a paint brush + nail polish remover for clean up.
  1. Unscrew the lids of your 3 or 4 gradient colors so they’re ready to go. Be careful not to knock them over! Here I used because I was feeling very mermaid inspired.
  2. Get a little cup of water and soak your triangle makeup sponge. Squeeze the sponge out about 80% leaving it damp but not wet. This will keep the polish from soaking up too quickly.
  3. Apply a single line of the darkest color toward the edge of your sponge. The first time, I went over the line twice so that there was enough polish to transfer to the nail.
  4. Next, use the second darkest color and make another line above that one. Coat it twice also. Keep going until you build up your 3-4 colors. NOTE: you want to work somewhat quickly so the polish doesn’t dry out.
  5. Dab your sponge on a piece of paper and you’ll see the colors together but not quite blended.
  6. Bounce it up and down in the same spot a few times and you’ll see how the separation of colors disappears and they become blended!
  7. Line the tip of the sponge up with the tip of your nail and when you’re ready, give it a med-firm press. Bounce it up and down a couple times in that spot. DON’T BE SCARED that you’re going to mess it up because you’re not. If you keep it in the same general spot it will be just fine. It doesn’t have to be exact. If it’s a little off each time you bounce it up and down that’s actually good because it blends the colors even more.
  8. Re-apply a line of each polish color to the sponge for every nail. If you work quickly, you can probably re-apply polish to the sponge for every other nail.
  9. Now you have pretty polish but a mess around your nails.
  10. Take a little polish remover + a paint brush and clean up the sides and aroud the cuticles.
  11. Apply a top coat once the ombre has dried completely. The top coat will also make it appear more blended.

Try it in other colors. We did pink and blue but we’d love to see what you choose! Have a great weekend


Sunday, 30 September 2012

Let Your Hair Down Sunday


Happy Sunday!
Happy Mooncake Festival too!
And also a perfect day to doll up yourself with new hair style while enjoying the mooncakes and admiring the lanterns...
Tie your hair out of the way with simple yet chic french twist...
top photo by angelaandithyle.com tutorial photos/post/design: Kristin Ess

Firstly, 
  1. Adding texture to the hair before you start is really important with this ‘do. 
  2. Tease the crown area of your hair.
  3. Tease the left side of your part.
  4. Tease the right side of your part.
  5. Grab all of your hair in one hand and give a little tease to the middle and ends. Don’t be too neat. Personally I think this updo looks best when it’s a bit messy.
  6. Join all of your ends together using a small clear elastic. You want to gather everything slightly to the side because when you go to roll it, it will end up in the middle of the back of your head.
  7. Put the clear elastic between two chopsticks and squeeze.
  8. Roll it up! If it doesn’t end up in the center, unroll it and try again!
  9. Hold the updo against your head with the chopsticks while you put some pins in. We like large bobbypins for extra support. Updos like this can get quite heavy. Also, be sure not to pin the chopsticks! Otherwise you won’t be able to get them out.
  10. Once you feel like everything is secure and in the right place, slide the chopsticks out.
Pull out some pieces around the front to soften this look. Give it a good spray with a strong holding hairspray.

If you think it's too bland, you dont you add...
Have a great day ahead


Saturday, 29 September 2012

Nail It


Sorry for the lack of nail tutorial for the past few weeks...
Hope this cutie can make it up

photos: Kristin Ess, post designed by Kristin Ess


A new way to make NAUTICAL! Straight strips ! Might be one of the easiest nail art manicures ever! Painting stripes can be a big challenge, but this is pretty simple…
  1. Paint the base navy blue. 
  2. Next, apply the white strips from the Sally Hansen’s French Manicure Kit.
  3. Using small scissors or cuticle nippers, clip the strips as close to the edge of your nail as possible.
  4. Use a thin paint brush to create hearts on the nail wherever you want. (Or use toothpick)
Last but not least, apply your top coat! 

Voila, easy and cute...
Add a mustache and be a authentic "sailor"...


Sunday, 23 September 2012

Let Your Hair Down Sunday


Or in this case, tie your hair up
Remember the perfectly cute ponytail worn by Barbie when you are a kid?
Now you can wear them instead!
It’s got a part, a little volume + some soft bouncy curls


photos + post: Kristin Ess
  1. Start with clean dry hair. If your hair isn’t perfectly clean, give it a little shot of dry shampoo! You can do a side part or a center part– which ever you feel is more flattering to your face shape.
  2. Make a diagonal section starting at your part and going down in front of your ear.
  3. You can see exactly where we parted here…
  4. And here. Now clip the hair from the front section up and save that for later.
  5. Give the hair a nice tease on top in your “crown area”.
  6. Smooth over the teased hair using the finer side of the comb so it doesn’t appear too ratty. At this point you can give the top a little spray if you want to!
  7. Now, put all the hair in the back into a nice, high, secure ponytail. It’s okay if you end up flattening out the teased bump a little bit because…
  8. You can use a tail comb to pull it back up. As long as there’s teased hair under there, you can get that volume back.
  9. Next we take out the front section. Take one side and drape it over the ponytail holder. Use a little spray to hold it in place if you need to.
  10. Use small bobby pins to secure the pieces you’re wrapping around the ponytail holder.
  11. Repeat the same thing on the other side. If hair falls out of this section or doesn’t reach, you can just let it fall and/or tuck it behind your ear.
  12. Curl all of the hair in the ponytail. I like to curl everything in the same direction on each side so that you get a pattern going, but you can definitely make a more messy curl if you’d rather.
  13. It’s completely up to you whether you brush the ponytail curls out or not. I personally like t0 brush them because the ponytail gets fuller and more bouncy.
  14. Check the back using a hand mirror and make sure it looks balanced. Give it a final veil of strong holding hairspray.
Top it up with a ribbon or hair band to dress it up...
Good luck dolls

Sunday, 16 September 2012

Let Your Hair Down Sunday


There's no better day than Sunday !
The perfect time to chillax with your family and friends
And also a day to dress up yourself
Rejoice with the bubble day with a feather blowing with your hair ...


Take cue from these celebrities on how to show off your feathery love

Tie your hair in a cutesy bun to show off your new feathers...
Or swept your hair to the side while balancing it with a colourful love...
if all else fail, 
just let your hair down and let the feathers peep out mysteriously with surprise...


Have a great weekend

Sunday, 9 September 2012

Let Your Hair Down Sunday...


Yay! It's Sunday again!
Your last day before you head back to work or school =(...
Don't let it burst you bubble
Celebrate it with pretty hair + hairy accessories...


post + design by Kristin Ess

It’s classic, it’s quick, it can make you look taller, and you can wear it with almost anything! The ballerina bun can be worn high up on the top of your head or down lower near the back of your neck. Either way, our favorite ”go-to-do” for anyone with collar bone length hair or longer.
• Tools: 1″ barrell curling iron, clear elastic or pony tail holder, smoothing + updo brush, 4-6 large bobby pins, firm holding hairspray.
• Using a 1 inch curling iron quickly curl all of your hair under.
• Flip hair over and gather into a high ponytail securing with an elastic or ponytail holder.
• Using your smoothing brush, back comb (lightly tease) hair. (This will help the bun look more voluminous!)
• Twist hair and wrap around the base to create your bun shape.
• Insert bobby pins along the base of the bun, securing it to your head.
• Spray all over with a firm holding hairspray and smooth down fly-aways.
TIP: I like to shake my head side to side to make sure it’s really secure before I finish.


Pair them with these babies to add quirkiness to compliment your cute up-do


Saturday, 25 August 2012

Nail It


Moustache goodies coming up
How could you resist?
Stay tune


photo http://www.youtube.com/cutepolish post designed by kristin ess


1) Start with a French Manicure
2) Seal it with a top coat
3) Freehand the little mustaches on where the pink + white meet.


Saturday, 18 August 2012

Nail It


Bows, Bows, Bows!!!
Surrounded your Saturday bubbliness with beautifully knotted ribbons and chiffons from your nails to fingers and even your ears...

photos + post by Kristin Ess

TOOLS: mint or turquoise polish, white polish, black polish, a thin paint brush, top coat
STEPS:
  1. Paint 2 coats of mint or turquoise as a base.
  2. Make a double scallop shape at the tip using the white polish.
  3. Take a little black polish on a very thin paint brush and follow the shape of your scallop and end with a loop as seen above.
  4. Next, take a little more black polish and follow the other scallop, go past the previous loop, and cross over the first black line. See photo if that sounds confusing!
  5. Take a dab of white polish and make a dot in the middle of your bow. This can be any color or you can even do this step with a rhinestone.
  6. Don’t forget your top coat!


Don't forget to post a picture for us to flaunt your pretty preps! 
Have a pretty weekends =)

Sunday, 12 August 2012

Let Your Hair Down Sunday


Pair up your breezy Sunday with this effortless chic braid


photo: kristin ess + thebeautydepartment.com post designed by kristin ess


  • Start this like a regular braid, but drop the top piece through to the bottom and leave it there.
  • Gently twist the 2 pieces you’re left with upward.
  • Add a new 3rd piece in between + drop it through.
  • Twist again and repeat. Keep going until you get to the back. Tie it with a clear elastic, tuck the end under, and secure with a bobby pin.
  • Remember there are only 2 main steps to this braid: twist + add a new piece. Imagine you’re just making a twist with only two pieces, but each time you do, you feed a new piece of hair through before you make the next twist. So you never actually keep the new piece. It’s really easy once you get it going. Try it on a friend first so you can see what you’re doing and how the pattern develops. Then try it on yourself!


  • Get more creative and you can style it like this....


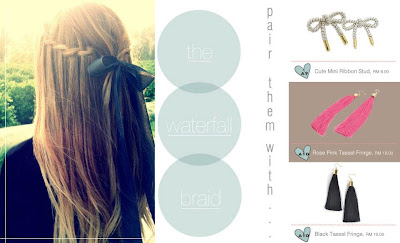
    And don't forget to accessories with earrings like THESE GOODIES to complete your look.


    Go ahead and have little fun with braids this Sunday


    Saturday, 11 August 2012

    Nail It!


    It's Saturday again!!!
    Say goodbye to the hectic weekdays and time to pamper yourself with some sweet manicure 


    photos/post: Kristin Ess nail art: Kimberly Hong

    TOOLS: base & top coat, dark pink, medium pink, light pink, reinforcement stickers.
    Steps:
    1. Start with either your darkest pink or lightest pink.  Try to use colors that have good coverage with just one coat because you want this layer to dry completely before the next step.
    2. Put 2 reinforcement stickers together (should look like an “8”) and place them towards the bottom of your nails. You are going to do this twice so look at your nail and cover 1/3 each time. You want to make room for all 3 of the colors for the final look.
    3. Paint your medium color. If possible just paint 1 coat, you will also want this to dry completely before placing stickers on your nails again. Use quick drying nail polish for the first and middle layers.
    4. Remove the stickers when the paint has dried with your medium shade. Waiting for it to dry is important because removing the sticker too soon will cause the nail polish to smear and not have clean lines! (it actually looks great even if you stop here and top it with a top coat)
    5. Now repeat steps 2 & 3 this time using either your darkest pink or lightest pink.
    6. Remove the stickers once that layer has dried and check out those nails!!! At first they may look choppy and layered but once your apply your top coat it will even out and complete the look on your nails. Plus putting stickers on your nails can dull your color some so this also helps your colors be bright and shiny again.

    Another mani-PERFECT Saturday! 
    Have a great weekends =)

    Saturday, 4 August 2012

    Nail It!


    Cheers to the freakin' weekend =)
    Prep your nails before your headout for fun on your Saturday
    A beautiful take on the classic French Manicure. Love it 


    photos/post: Kristin Ess nail art: Kimberly Hong
    It’s good to change things up every now and then. Today let’s have a some fun with the classic French manishall OUI!? We’re simply adding two rows of cute little dots below the classic French manicure line. Simple enough, right? Get out your dotting tooland let’s get started!
    1. Essie makes some of our favorite colors for this particular look. You’ll need a good, strong white and a very sheer pink or peach. (It can be anything with a round end, maybe a blunt toothpick)
    2. Make sure your nails are completely clean. No need for a base coat.
    3. Paint a classic white french tip. It’s fine to be a little messy.
    4. Use a little polish remover along with a brush to clean up + perfect the bottom of the line.
    5. Go about just below the french tip line and make a row of 5 dots. There should be a little space (about 1/8″) like you see in picture 5. Make one dot in the very center first, then two on each side. We had the best luck when we made these 5 dots first and then sandwiched the middle row in between in the next step.
    6. Now go right in between the French tip line and that row of dots and make 4 more dots. They should be centered between the dots from the first row you created.
    7. Wait for your dots to dry completely and then do a coat of a sheer pink/peach color. We did 2 super thin coats.
    8. Last but not least, add a fast drying top coat.

    It is easy and easy and beautiful than the classic french manicure. You can be try with different colors combination. Now you are all set for your fun night. 
    CHEERS =)